
Summary of "Test-Driven Development for Embedded C" by James W. Grenning
Preface
Test-Driven Development for Embedded C by James W. Grenning
Initial Thoughts
I enjoyed this book. It clearly demonstrated the usefulness of TDD and what is more it layed out a clear way to start performing TDD in C. This book may have wandered every once in a while, but it kept true to its course and even taught some interesting C constructs along the way.
Book Layout
The book is layed out into the getting started section where you get used to the tools and conventions of TDD, then in the testing with collaborators section you see how to mimic other devices to enable testing even when you have external dependencies. The last section deals mostly with design and lends some good C design practices.
Chapter 1: Test-Driven Development
The first chapter is a fairly straight forward introduction that fleshes out what test driven development is all about. At its most basic, TDD is all about making meaningful incremental changes that are always validated by tests. This process can be amply summarized by the quip “Red, Green, Refactor”. Thus showing that you right a test for new behavior, once the test is passing then the test can be used to ensure any stylistic changes don’t modify behavior. These incremental changes allow for quicker and more reliable development while also constantly pushing code to be more modular. The figures below highlight the differences between typical “Debug Later” programming and TDD.
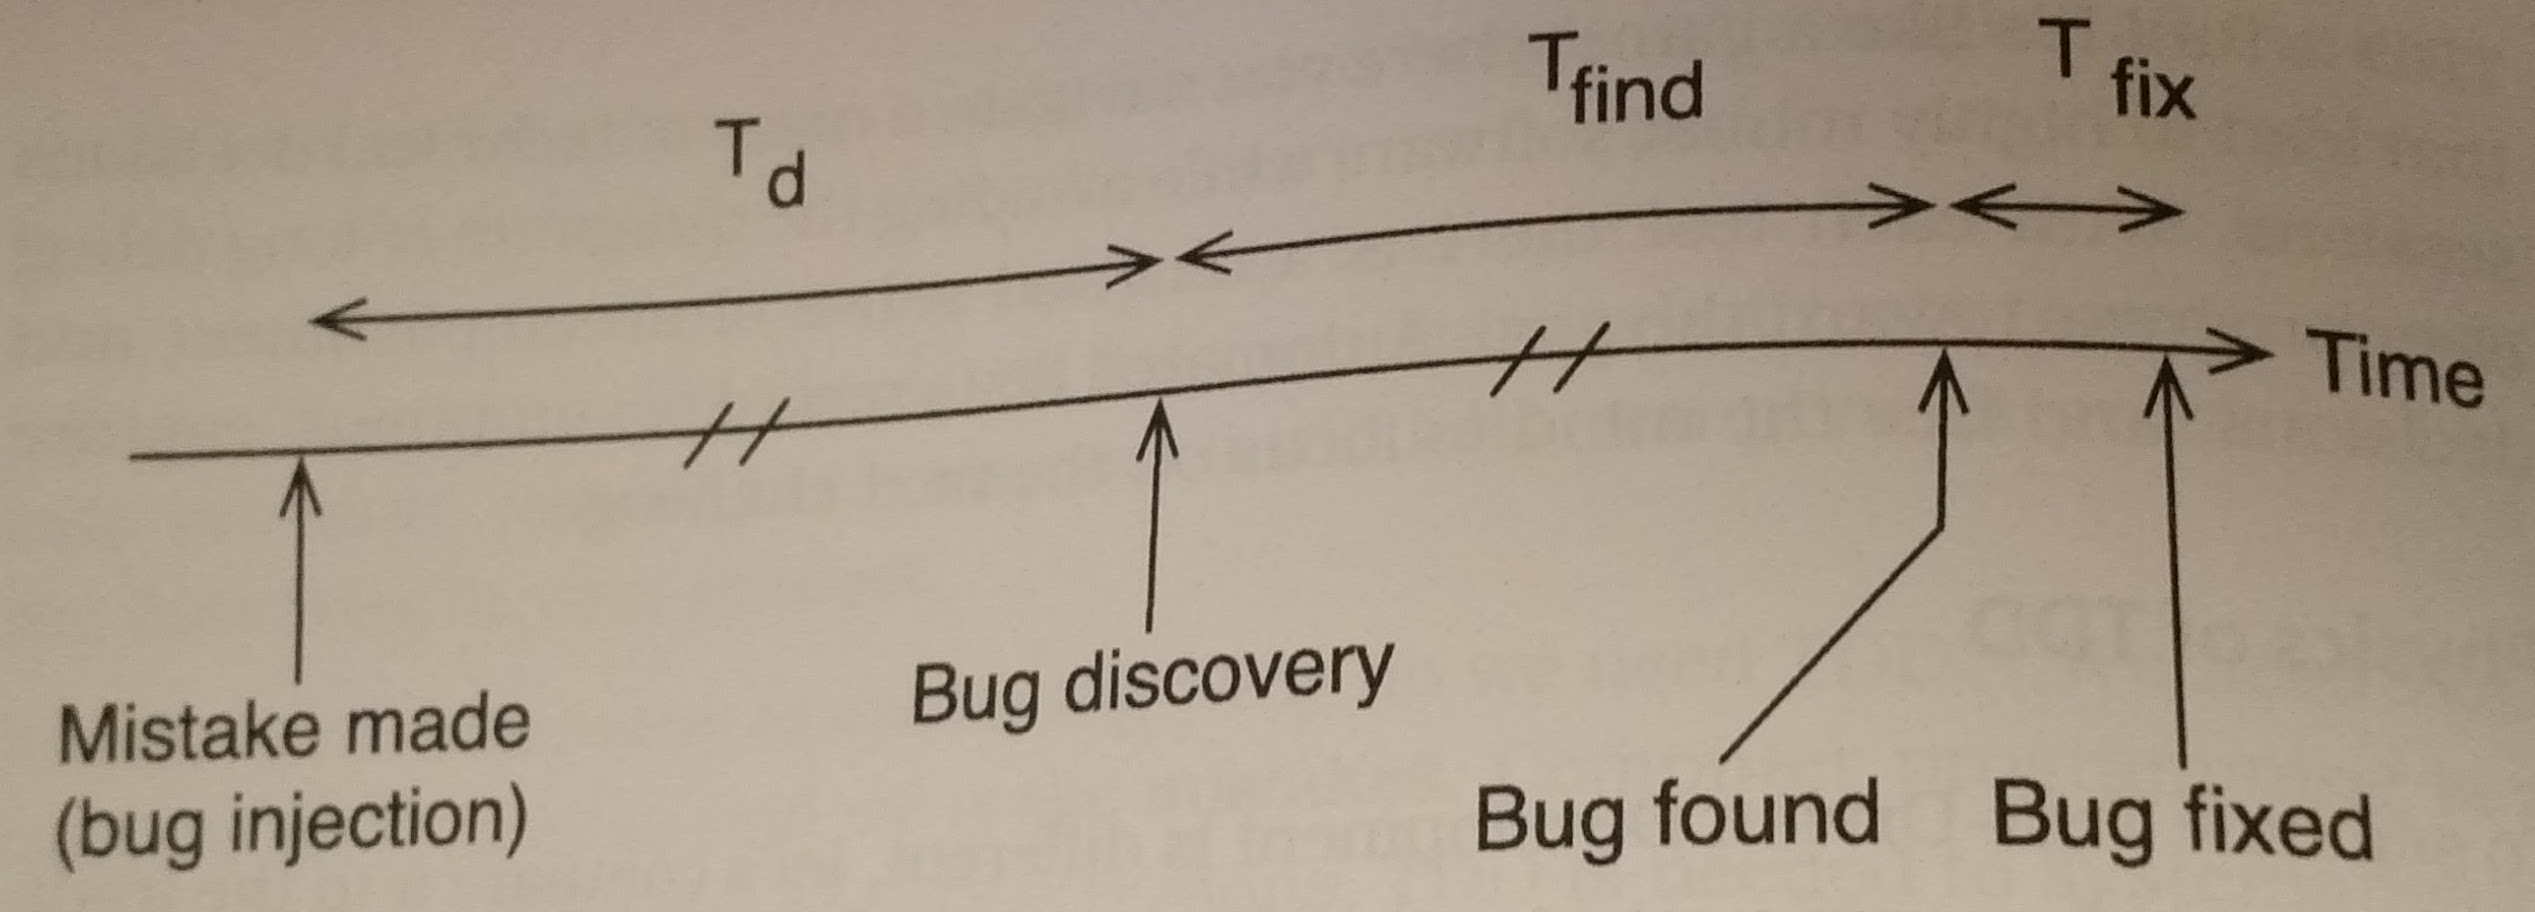
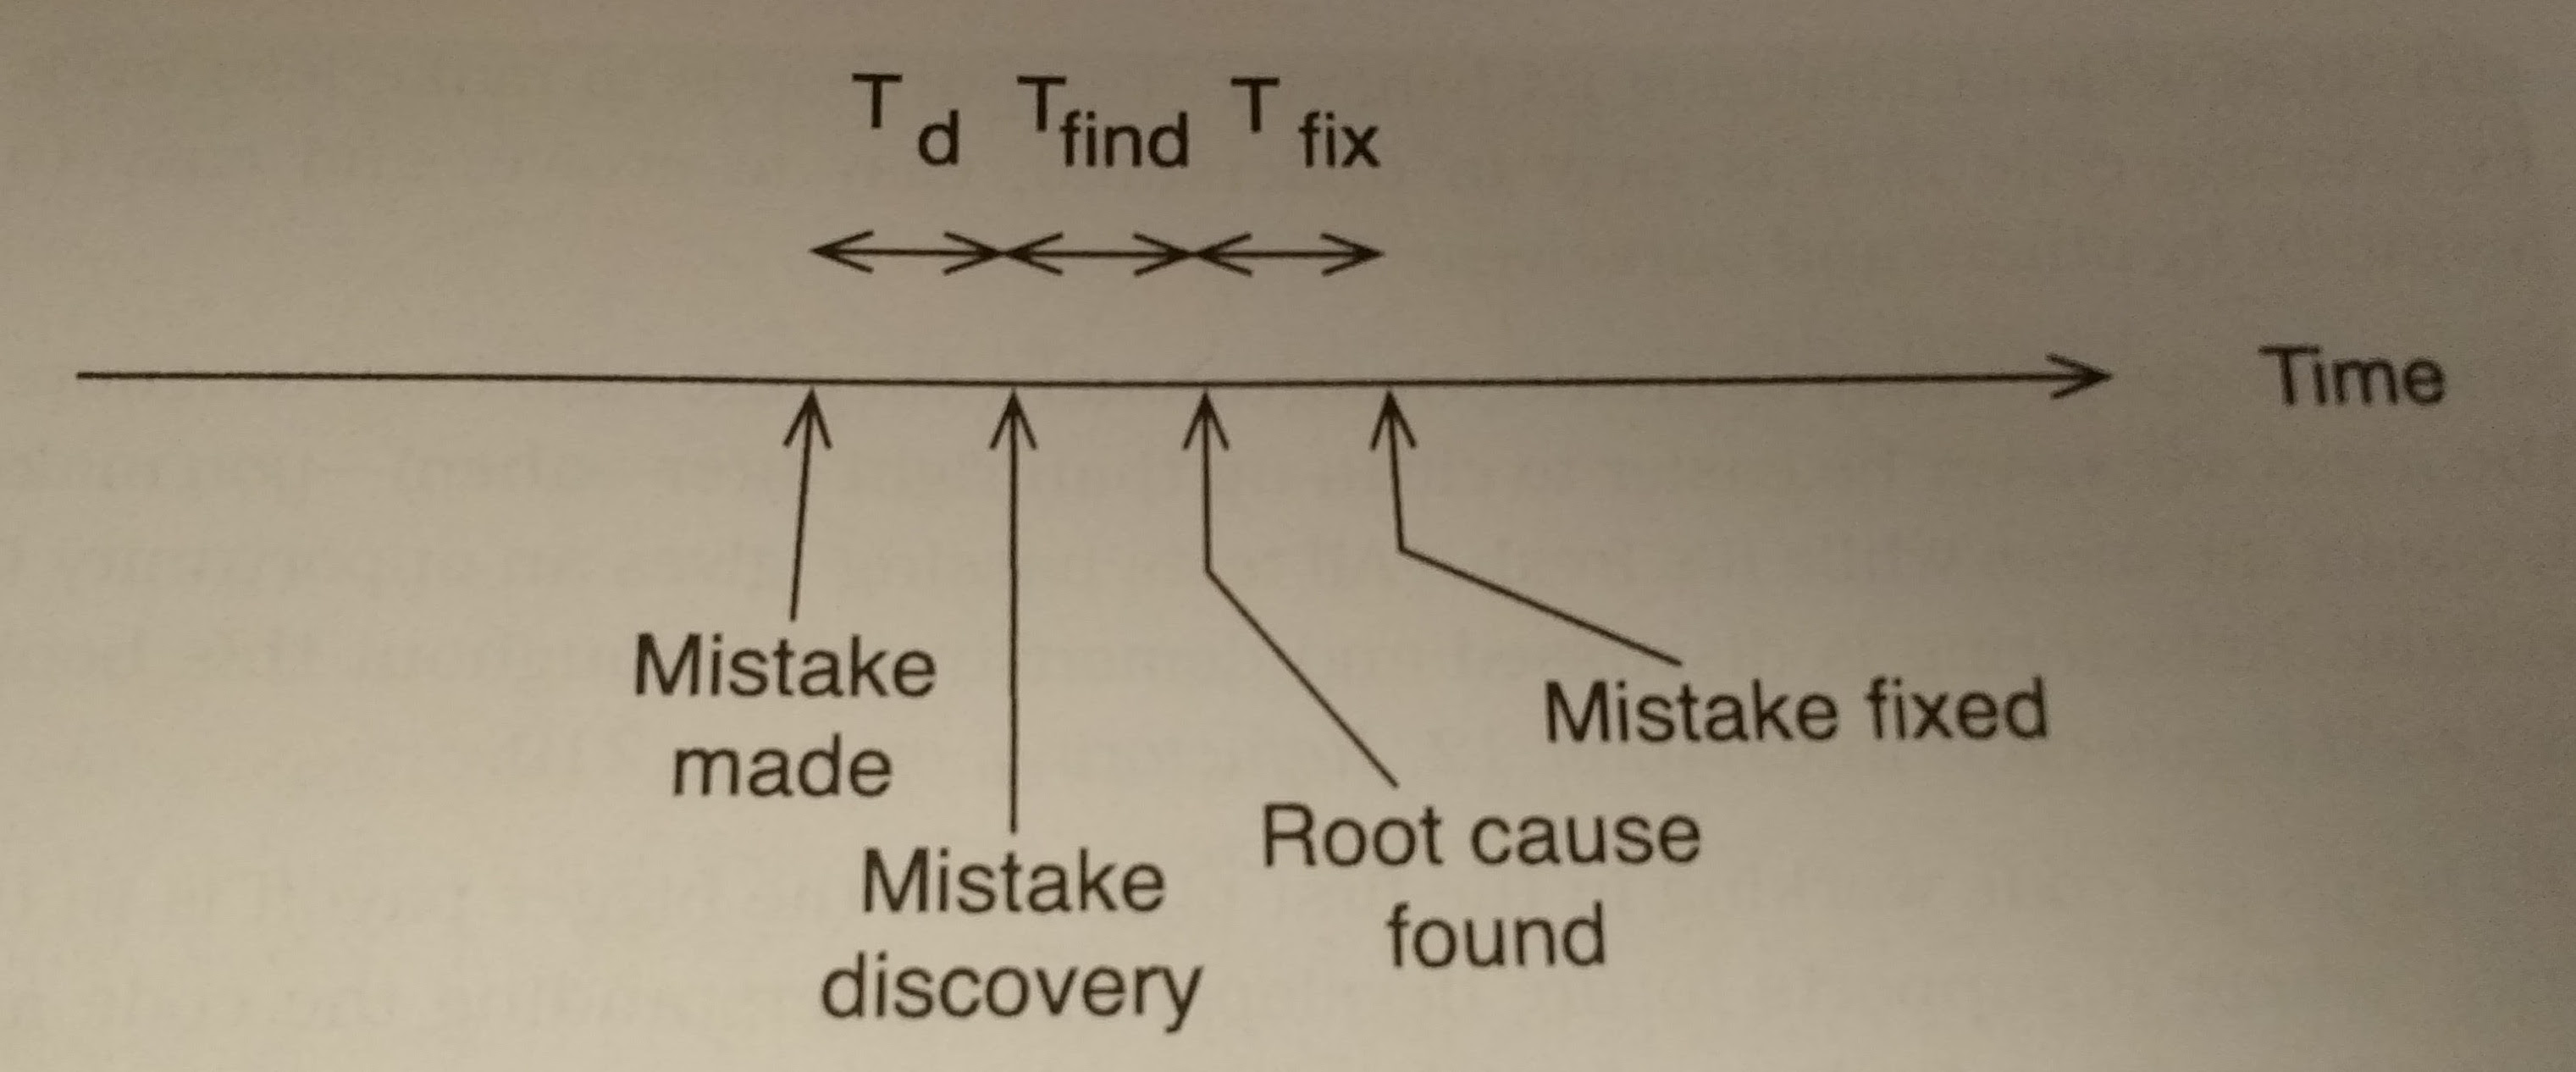
It’s quite easy to see how much time is saved when finding the bug. Since you don’t have to do any mental context switching to get back up to speed with the codebase debug time can go by much quicker.
Getting Started
Chapter 2: Test-Driving Tools & Conventions
In Chapter 2, James introduces the 2 test harnesses that he covers: Unity and CPPUTest. These are fairly similar harnesses, one is written in C++, which allows it to automatically add tests to the harness.
Both harnesses provide a similar interface, exposing test groups that can be used to group similar tests together into test fixtures. These fixtures are used to group commonalities, such as setup and teardown functionalities. Both harnesses also provide ways to check for equality and the like. Below are some examples of using these two libraries similar to what the author provided.
CppUTest Example
TEST_GROUP(thing) {
    const char * expected_val;
    int expected_num;
    void setup() {
        // Do Stuff
    }
    void teardown() {
        // Do more stuff
    }
    void helper_fxn(int n) {
        expected_num = n;
    }
};

TEST(thing, DontDoMuch) {
    helper_fxn(5);
    LONGS_EQUAL(expected_num, 5);
}
You can see that the group seems to be a macro that generates a class.
Unity Example
// Test.c

TEST_GROUP(thing);

static const char * expected_val;
static int expected_num;

TEST_SETUP(thing) {
    // Do stuff
}
TEST_TEAR_DOWN(thing) {
    // Do more stuff
}
static void helper_fxn(int n) {
    expected_num = n;
}

TEST(thing, DontDoMuch) {
    helper_fxn(5);
    TEST_ASSERT_EQUAL(expected_num, 5);
}

// TestRunner.c

TEST_GROUP_RUNNER(thing) {
    RUN_TEST_CASE(thing, DontDoMuch);
}
In the unity example, you need to manually add each test to a runner or use a script. Also, all methods and variables are usually just made as static to have file scope, since c doesn’t have the concept of classes.
Both test harnesses follow these 4 phases of TDD:
- Setup
- Exercise
- Verify
- Cleanup
Chapter 3: Starting a C Module
Tests are much easier to write when code is more modular. To make single
instance modules you can simply provide methods that are defined in a header
file and indirectly act on static variables in the .c file, kind of like
private class variables in C++. For modules that have more than one instance
you can use a typedef of a forward declared struct. For example, you can place
the following in your header file.
typedef struct ObjectStruct * Object;Note that when you have hidden data like this, you should always have create
and destroy methods to handle setting up and tearing down these data
structures.
Test lists are very useful when developing new functionality since they basically demonstrate the requirements. An example for a LED driver is given:
- All LEDs are off after the driver is initialized
- A single LED can be turned on
- Turn on all LEDs
The trick to making C modules that operate on hardware easily testable is to initialize them with a pointer to the region of memory that they should operate on. Since most embedded modules work by using MMIO to communicate with the hardware, we can trick them during testing by redirecting them to a region of memory which we control. This methodology is known as dependency injection.
Using this knowledge we can begin development, but hold your horses. When developing, try to only write code when there is a test for it. More specifically, follow Bob Martin’s 3 laws of TDD shown below:
3 Laws of TDD - Bob Martin
- Don’t write code unless it makes a failing test pass.
- Don’t more more of a test than is sufficient to fail.
- Don’t write more code than is sufficient to pass one failing test.
This methodology may seem counterintuitive at first, but it allows you to create a well-defined vise around your code, guaranteeing behavior and showing very definite incremental progress which can be very satisfying. It may even seem absurd, since you are encouraged to fake results at first to get things passing, then add more tests. You tend to stop faking things once it is easier to do it for real. This is known as DTSTTCPW or “Do the Simplest Thing that Could Possibly Work”.
Also keep thse tests small & focused, trying to test only 1 facet of your code. Don’t be afraid to reuse initialization, you’ve guaranteed that it works, now you can build another test using it and testing something else. Follow the TDD state machine during development.
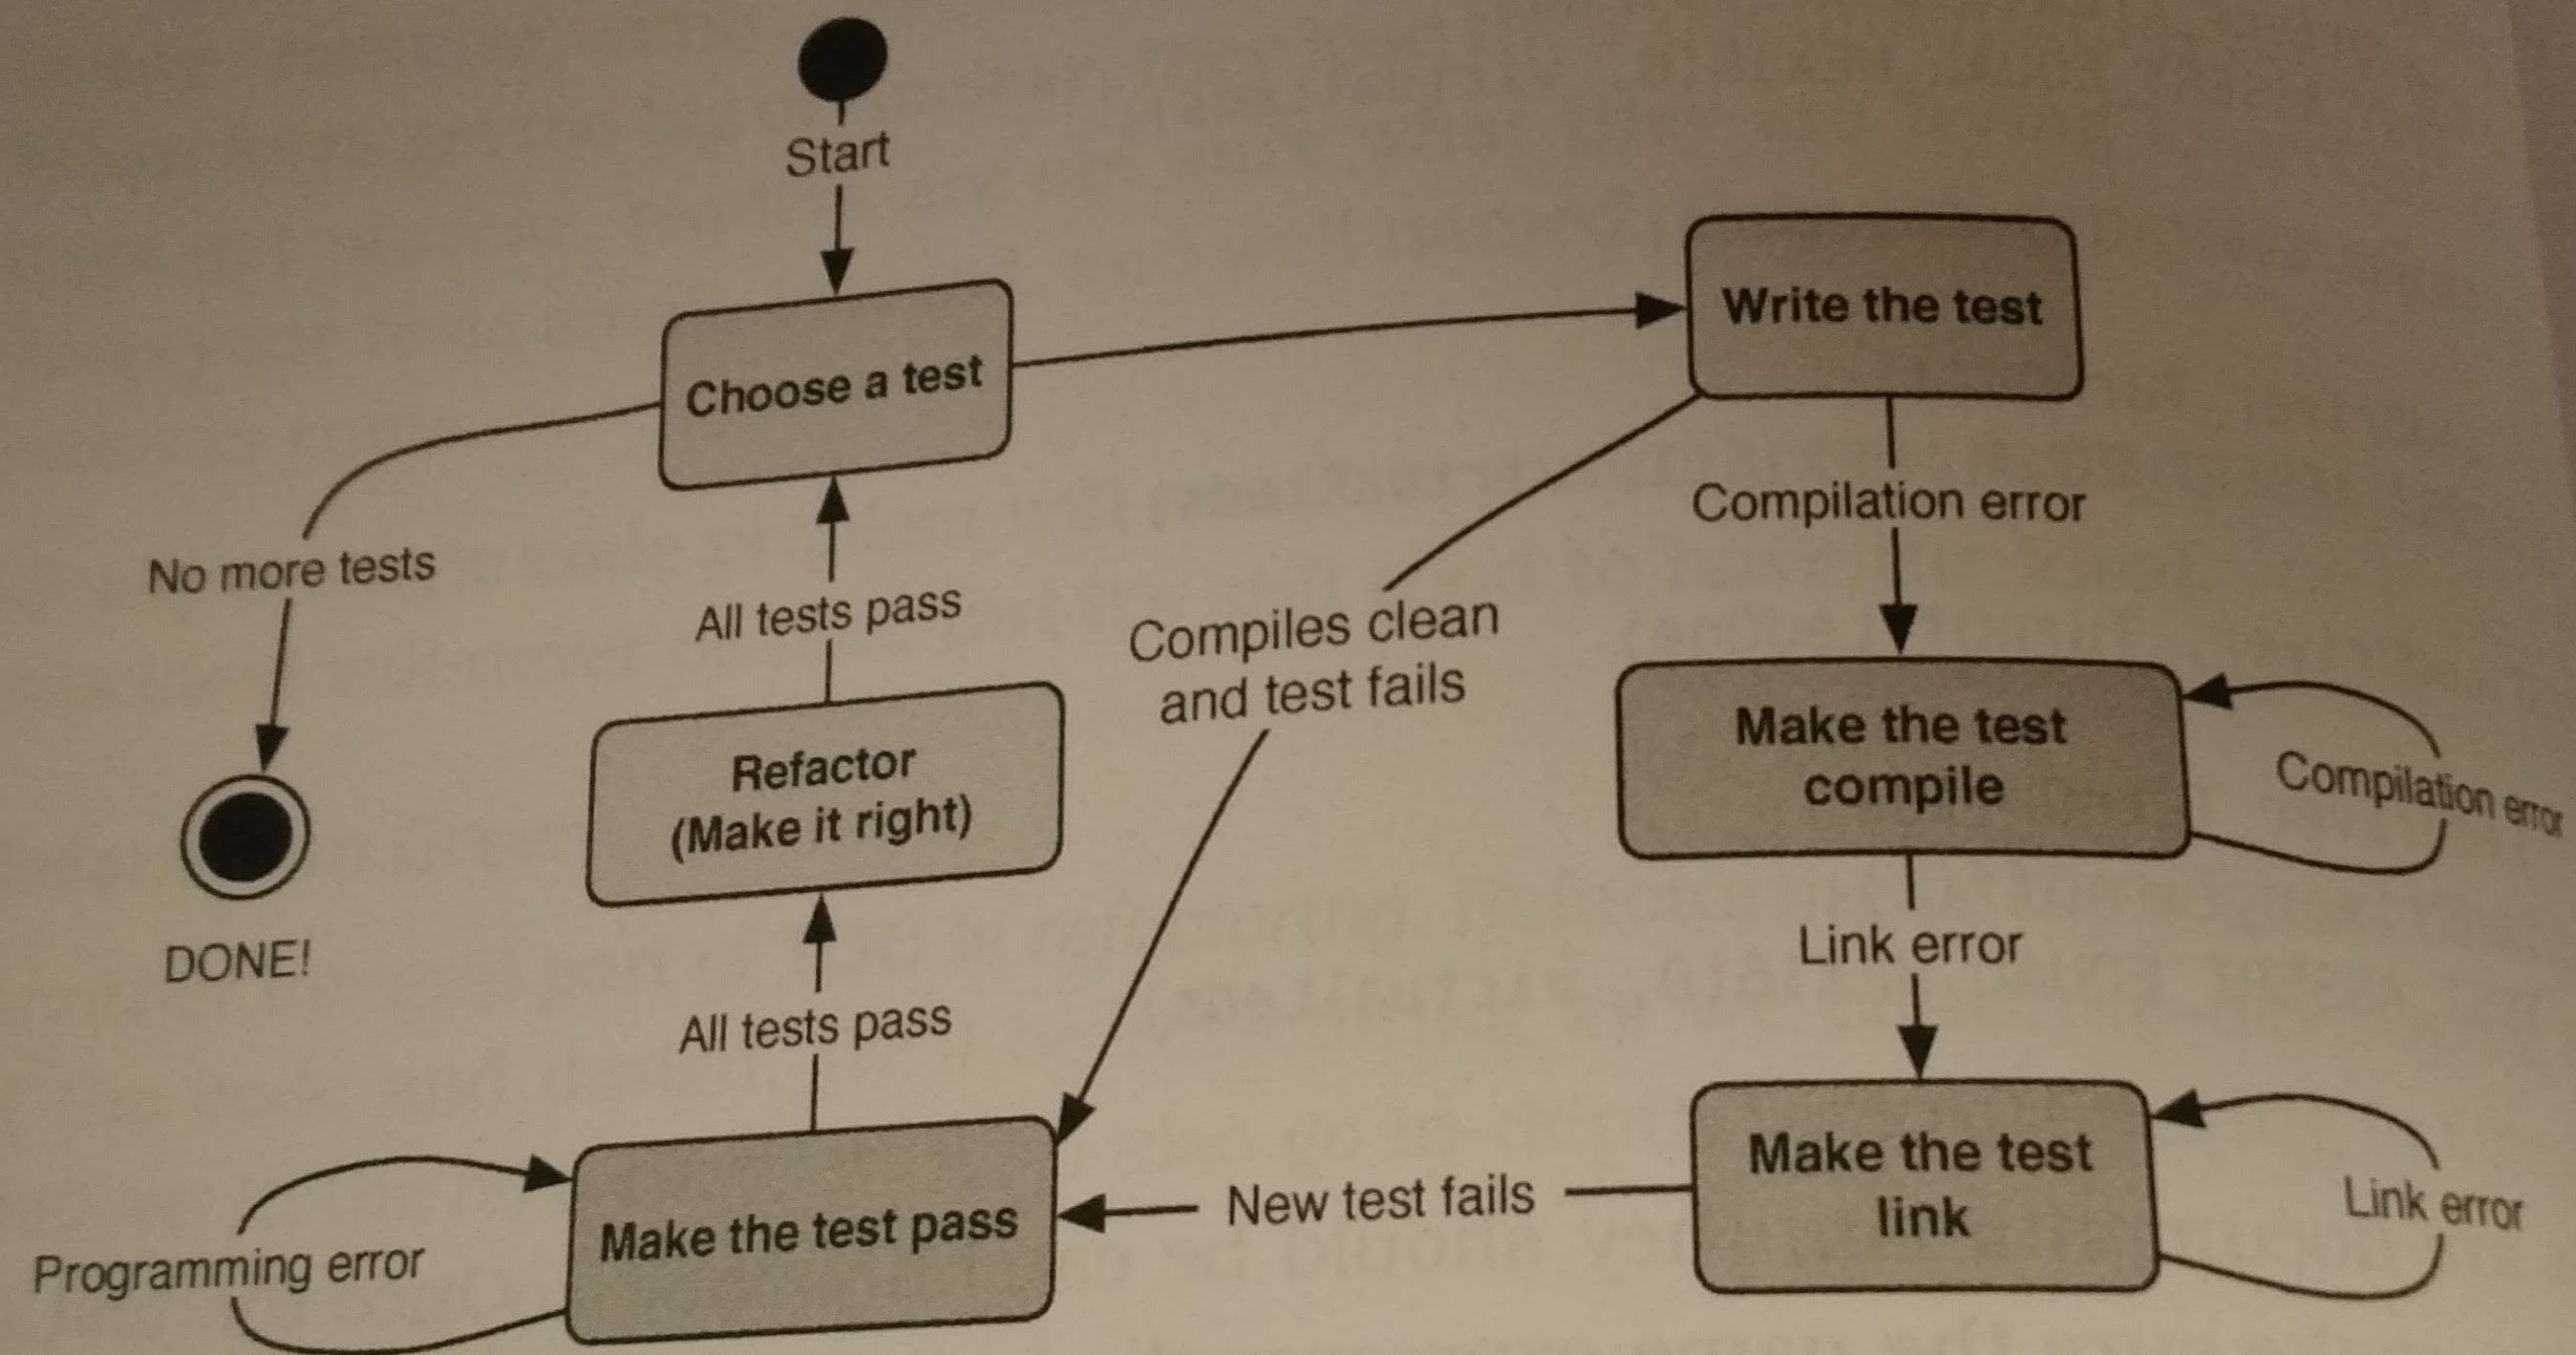
Also try to keep your tests following the F.I.R.S.T methodology:
- F - Fast
- I - Isolated
- R - Repeatable
- S - Self-verifying
- T - Timely
Chapter 4: Testing your Way to Done
Chapter 4 is basically a walkthrough TDD, showing a detailed example of what the various steps are. Here are a couple of tidbits I gleaned from reading through it. When refactoring don’t break anything, copy / paste, don’t cut / paste. Once everything is in place then substitute your change. Once tests are passing, remove the old code and if tests still pass you’re all set! During this section James makes use of a stub, a test version of a production function that gives us insight into what was passed into that function, for example we can get information on what was logged, etc. Also note that once an error get’s introduced during TDD just undo to debug, since you just added the faulty code you can very quickly see what went wrong.
Chapter 5: Embedded TDD Strategy
Chapter 5 is the most relevant chapter to embedded systems development and discusses how to keep the software and hardware in working order. James recognizes that testing on hardware can be expensive in time and other factors. Since you usually don’t have your target hardware for some time, it’s usually a good idea to get an evaluation board for your processor, this reduces the number of unknowns and can allow you to start working on hardware before you get the eventual target.
Dual-targeting is an important concept when working with TDD on embedded systems. You want to be able to run most modules on the target platform, your evaluation board, and your development setup. You’ll be doing a lot of upfront verification on the development system, but you obviously want to ensure that everything works on the other platforms. Dual-targeting allows us to keep this need forefront in our minds durnig development.
During development follow the embedded TDD cycle:
- The standard TDD micro cycle - every save
- Compiler Compatibility check - every commit
- Run unit tests on eval board - every day
- Run unit tests on target board - every day
- Run manual acceptance tests on target board - hardware or hardware code change
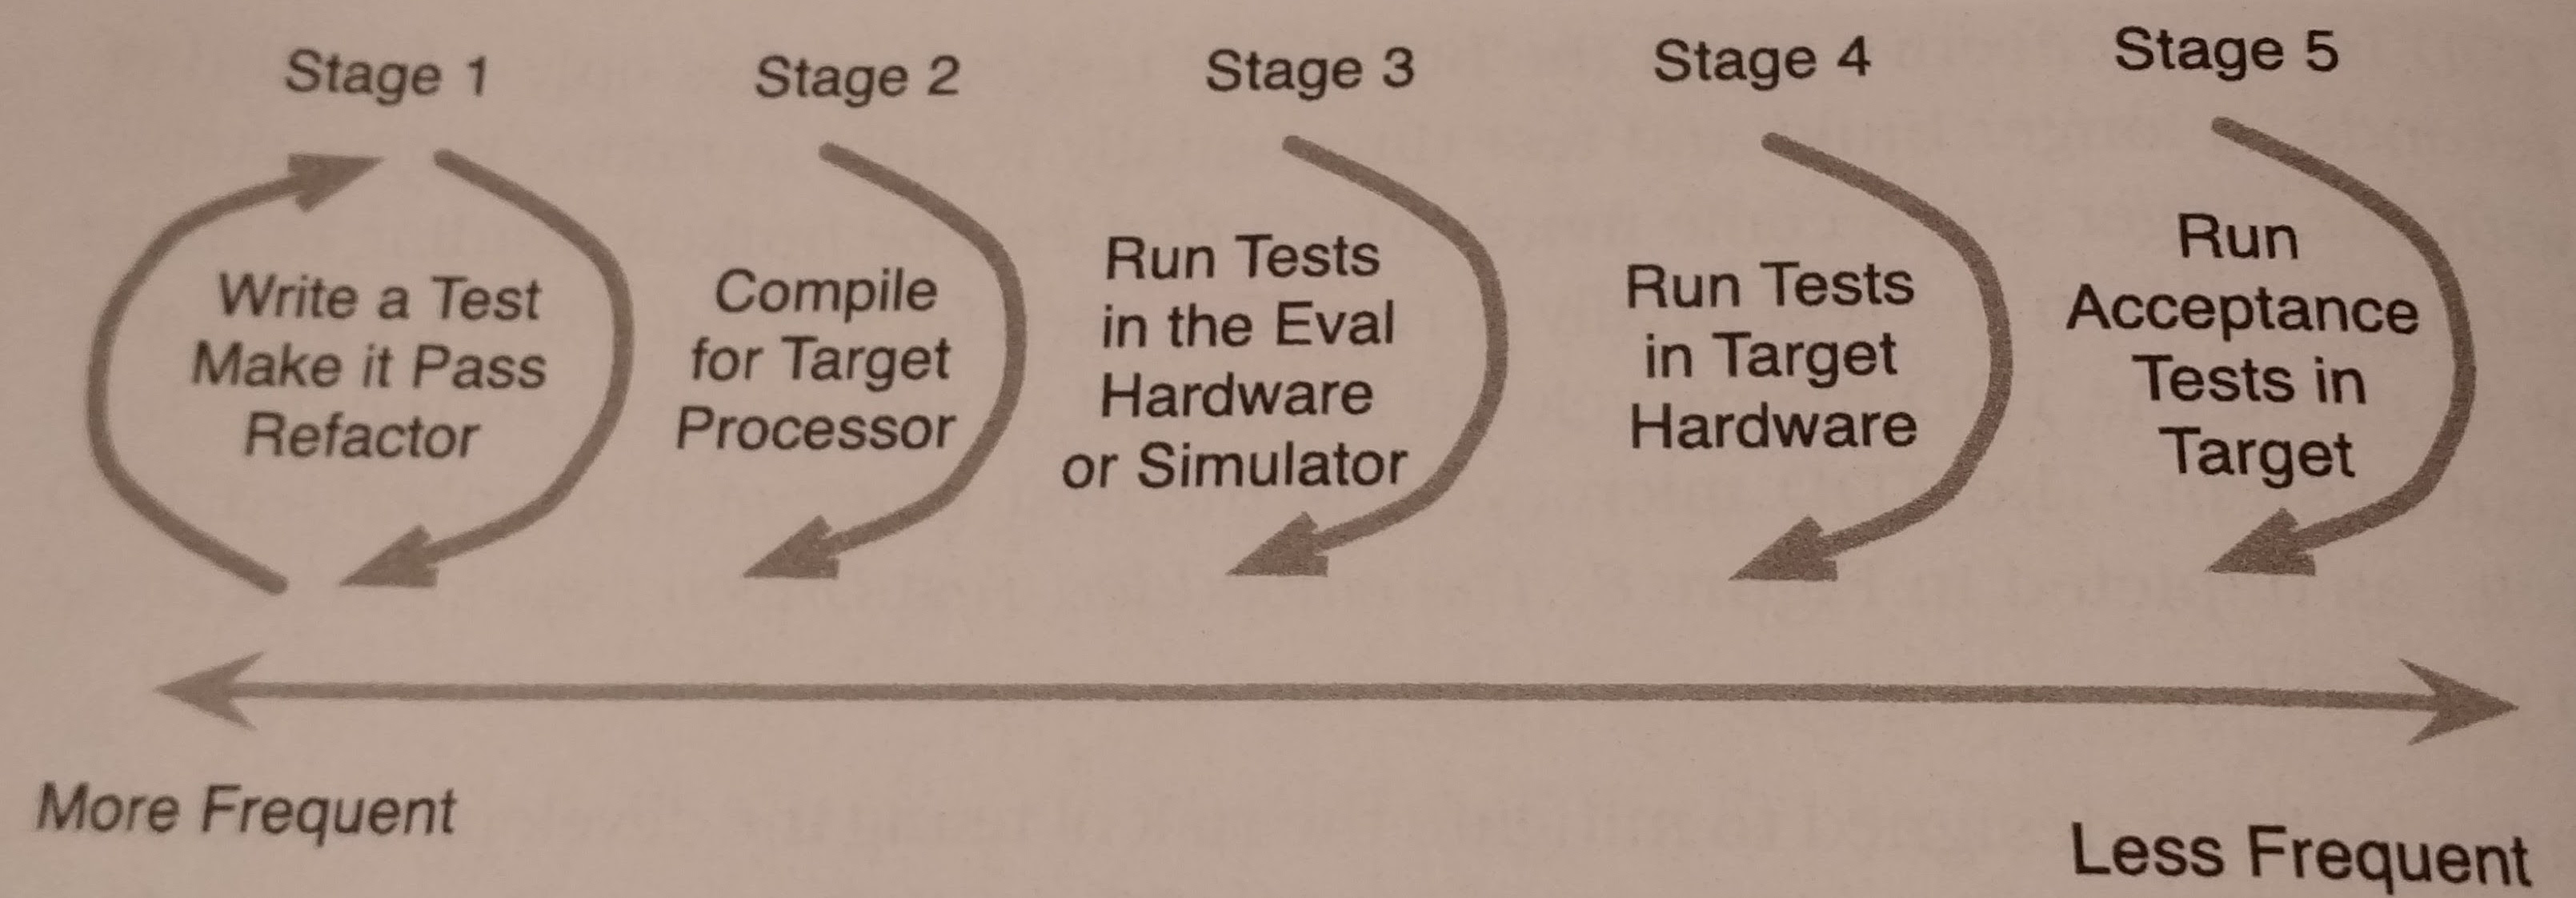
When setting up a system for separate targets you could take a couple of different approaches. You could use:
- conditional compilation (ugly, hard to understand)
- platform specific header files (use
#defineto define functions differently) - platform specific implementation directories (the best answer). This is an adapter pattern.
Automated hardware tests should find any language construct differences, memory issues, and misunderstanding of hardware. They must also be automatically verified.
The manual acceptance tests should have some sort of command terminal to communicate with the hardware to trigger tests and get the expected result. You can also have long / short tests, running them with varying frequencies. You can also use external instruments to test, such as a function generator.
Chapter 6: Excuses & Problems with TDD
Chapter 6 reads like a FAQ or troubleshooting guide for TDD enumerating various peoples’ problems with TDD in the embedded world and then addressing them. I’ll highlight a couple of the interesting ones.
Single-step and hardware debugging are very slow try to avoid it, guess what TDD helps avoid it.
What about testing after development (TAD)? TDD is more about than development, while TAD is all about testing, doesn’t have as immediate of feedback, and doesn’t get as much coverage.
TDD doesn’t find all bugs. While this is true, it does find a lot of them and really helps during development. You obviously still need these test types:
- integration
- acceptance (fulfill requirements)
- exploratory
- load & performance (explore limits)
TDD causes long build times. Well, try modularizing your builds.
TDD is too memory intensive on HW. Use a small harness, break into multiple runners.
Create a big visible chart BVC to track various factors of your code e.g. flash size, ram, etc.

Isn’t simulating hardware difficult? It is, that’s why we mock things and merely simulate the interaction, not the entire system.
Testing Modules with Collaborators
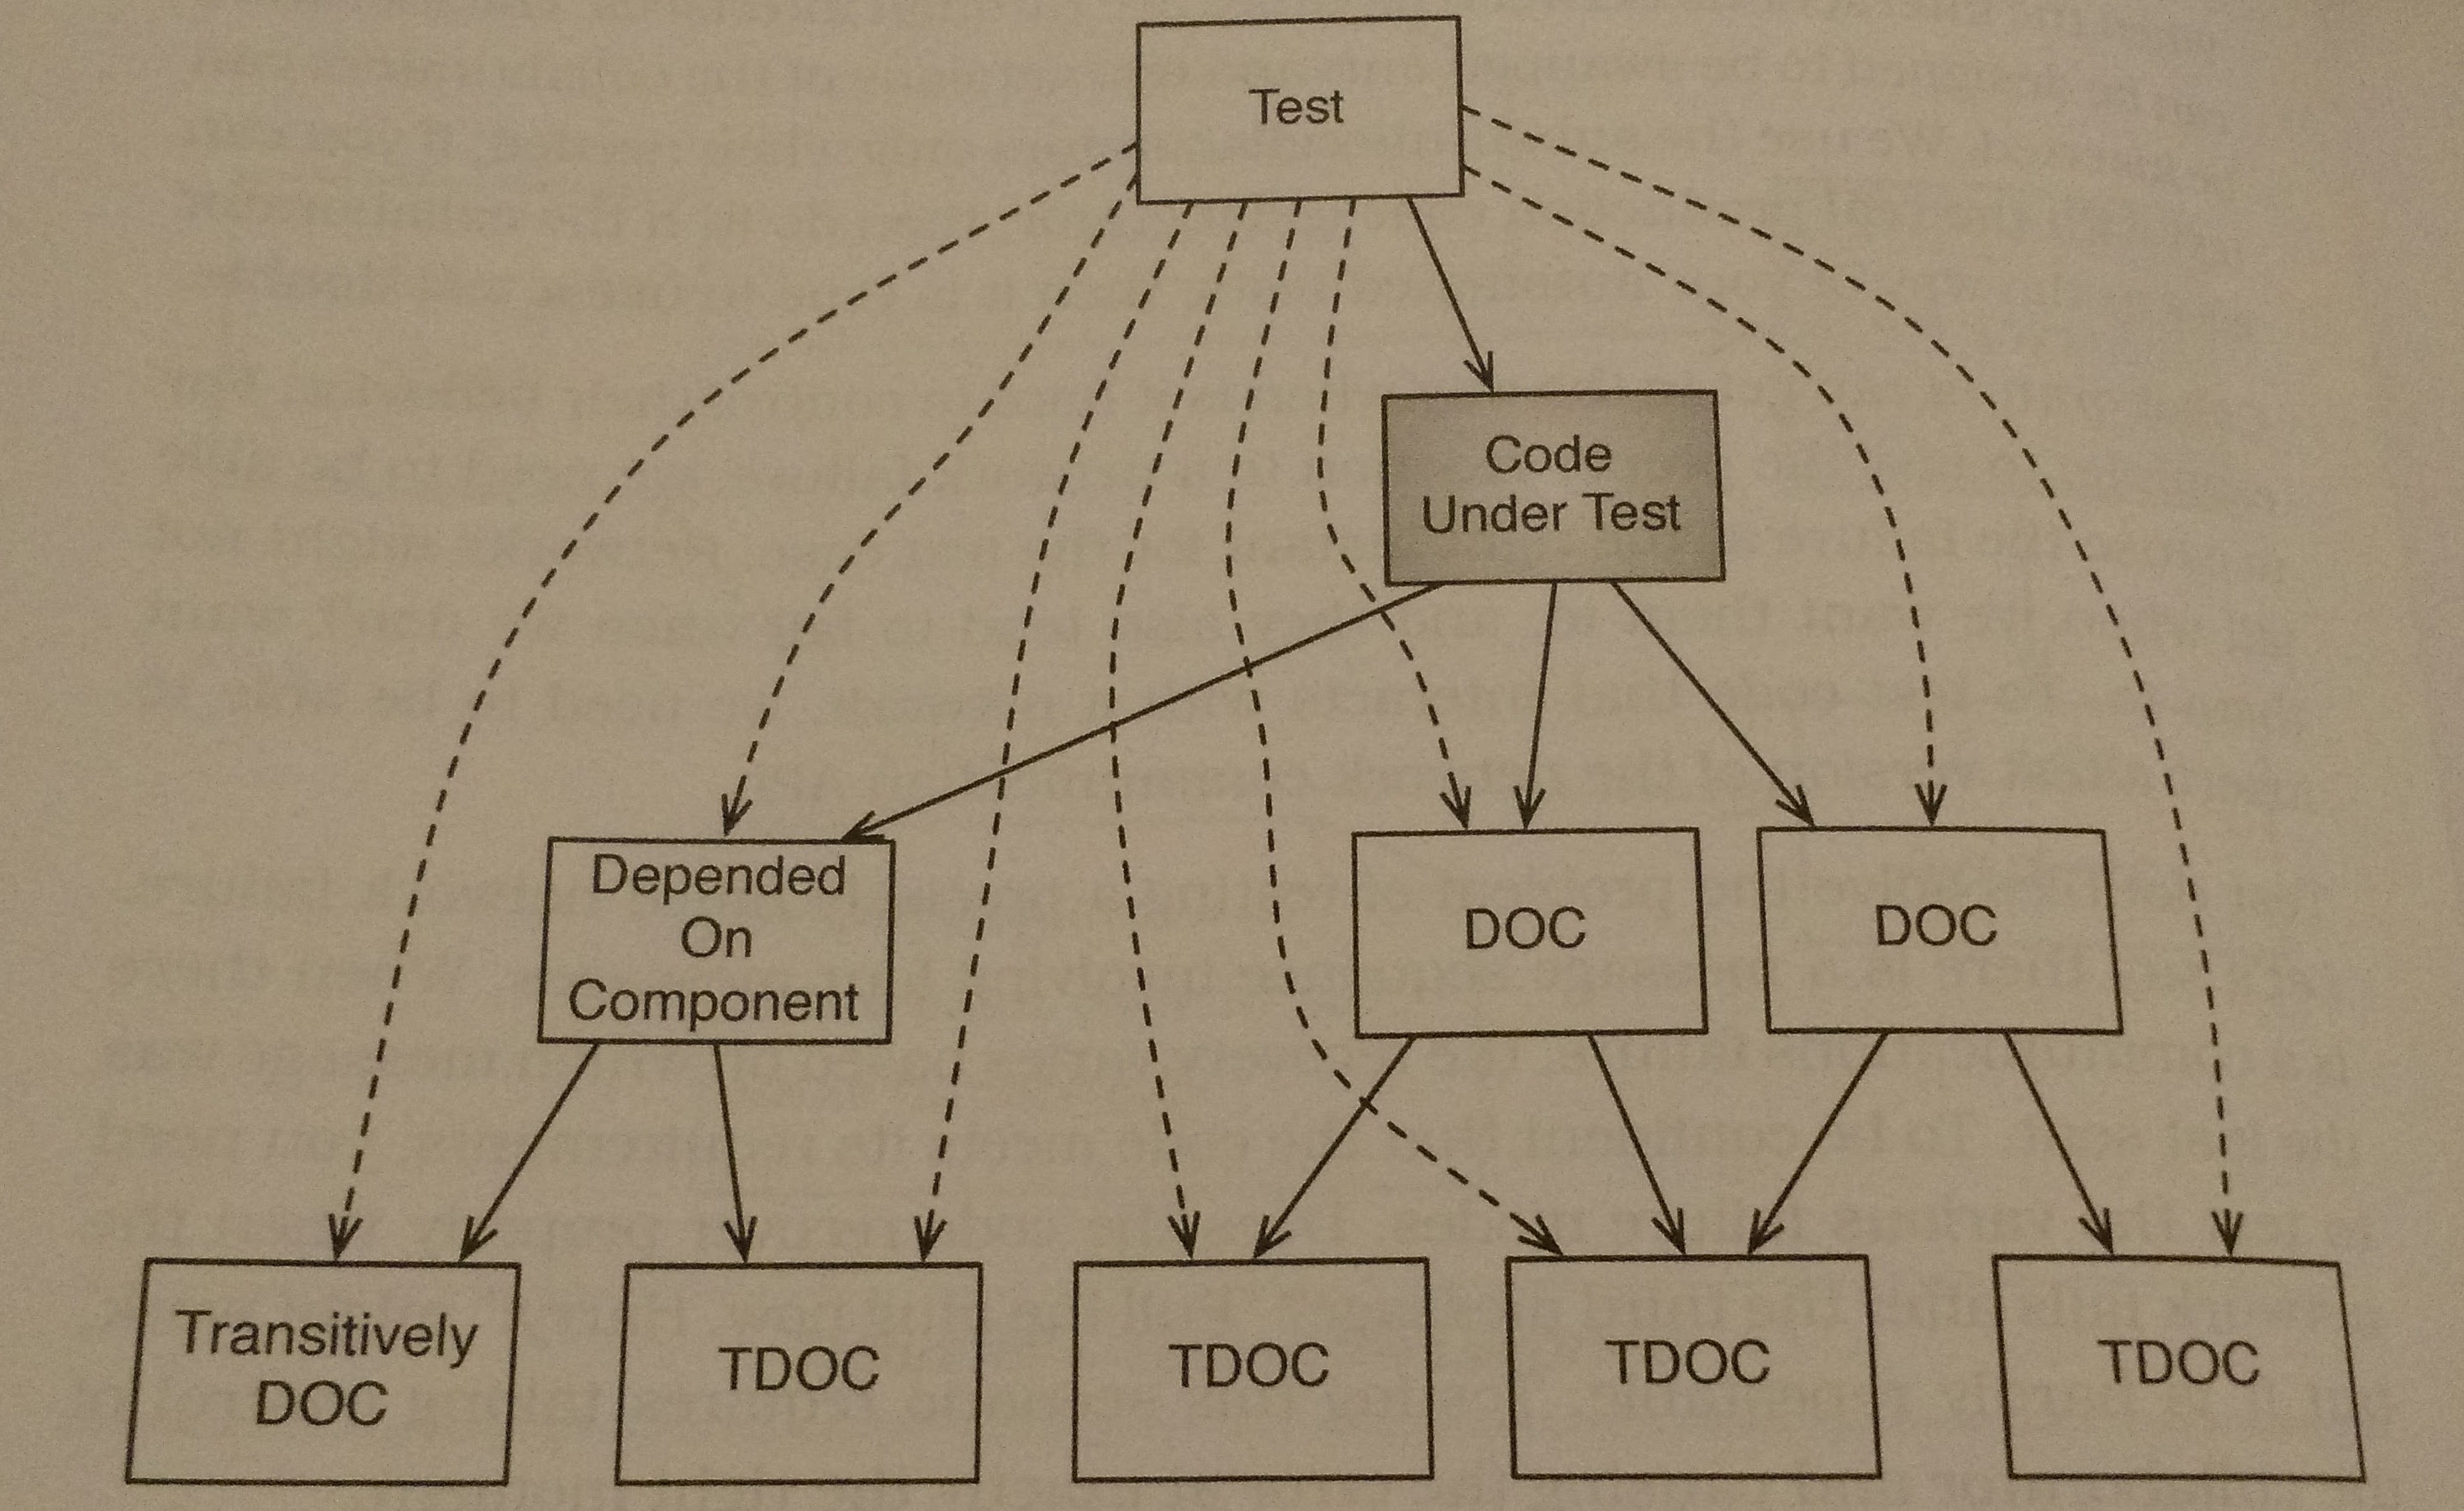
A collaborator isn’t someone that you work with, it’s any function, data, or module that is outside the code under test CUT that the CUT depends upon.
Chapter 7: Introducing Test Doubles
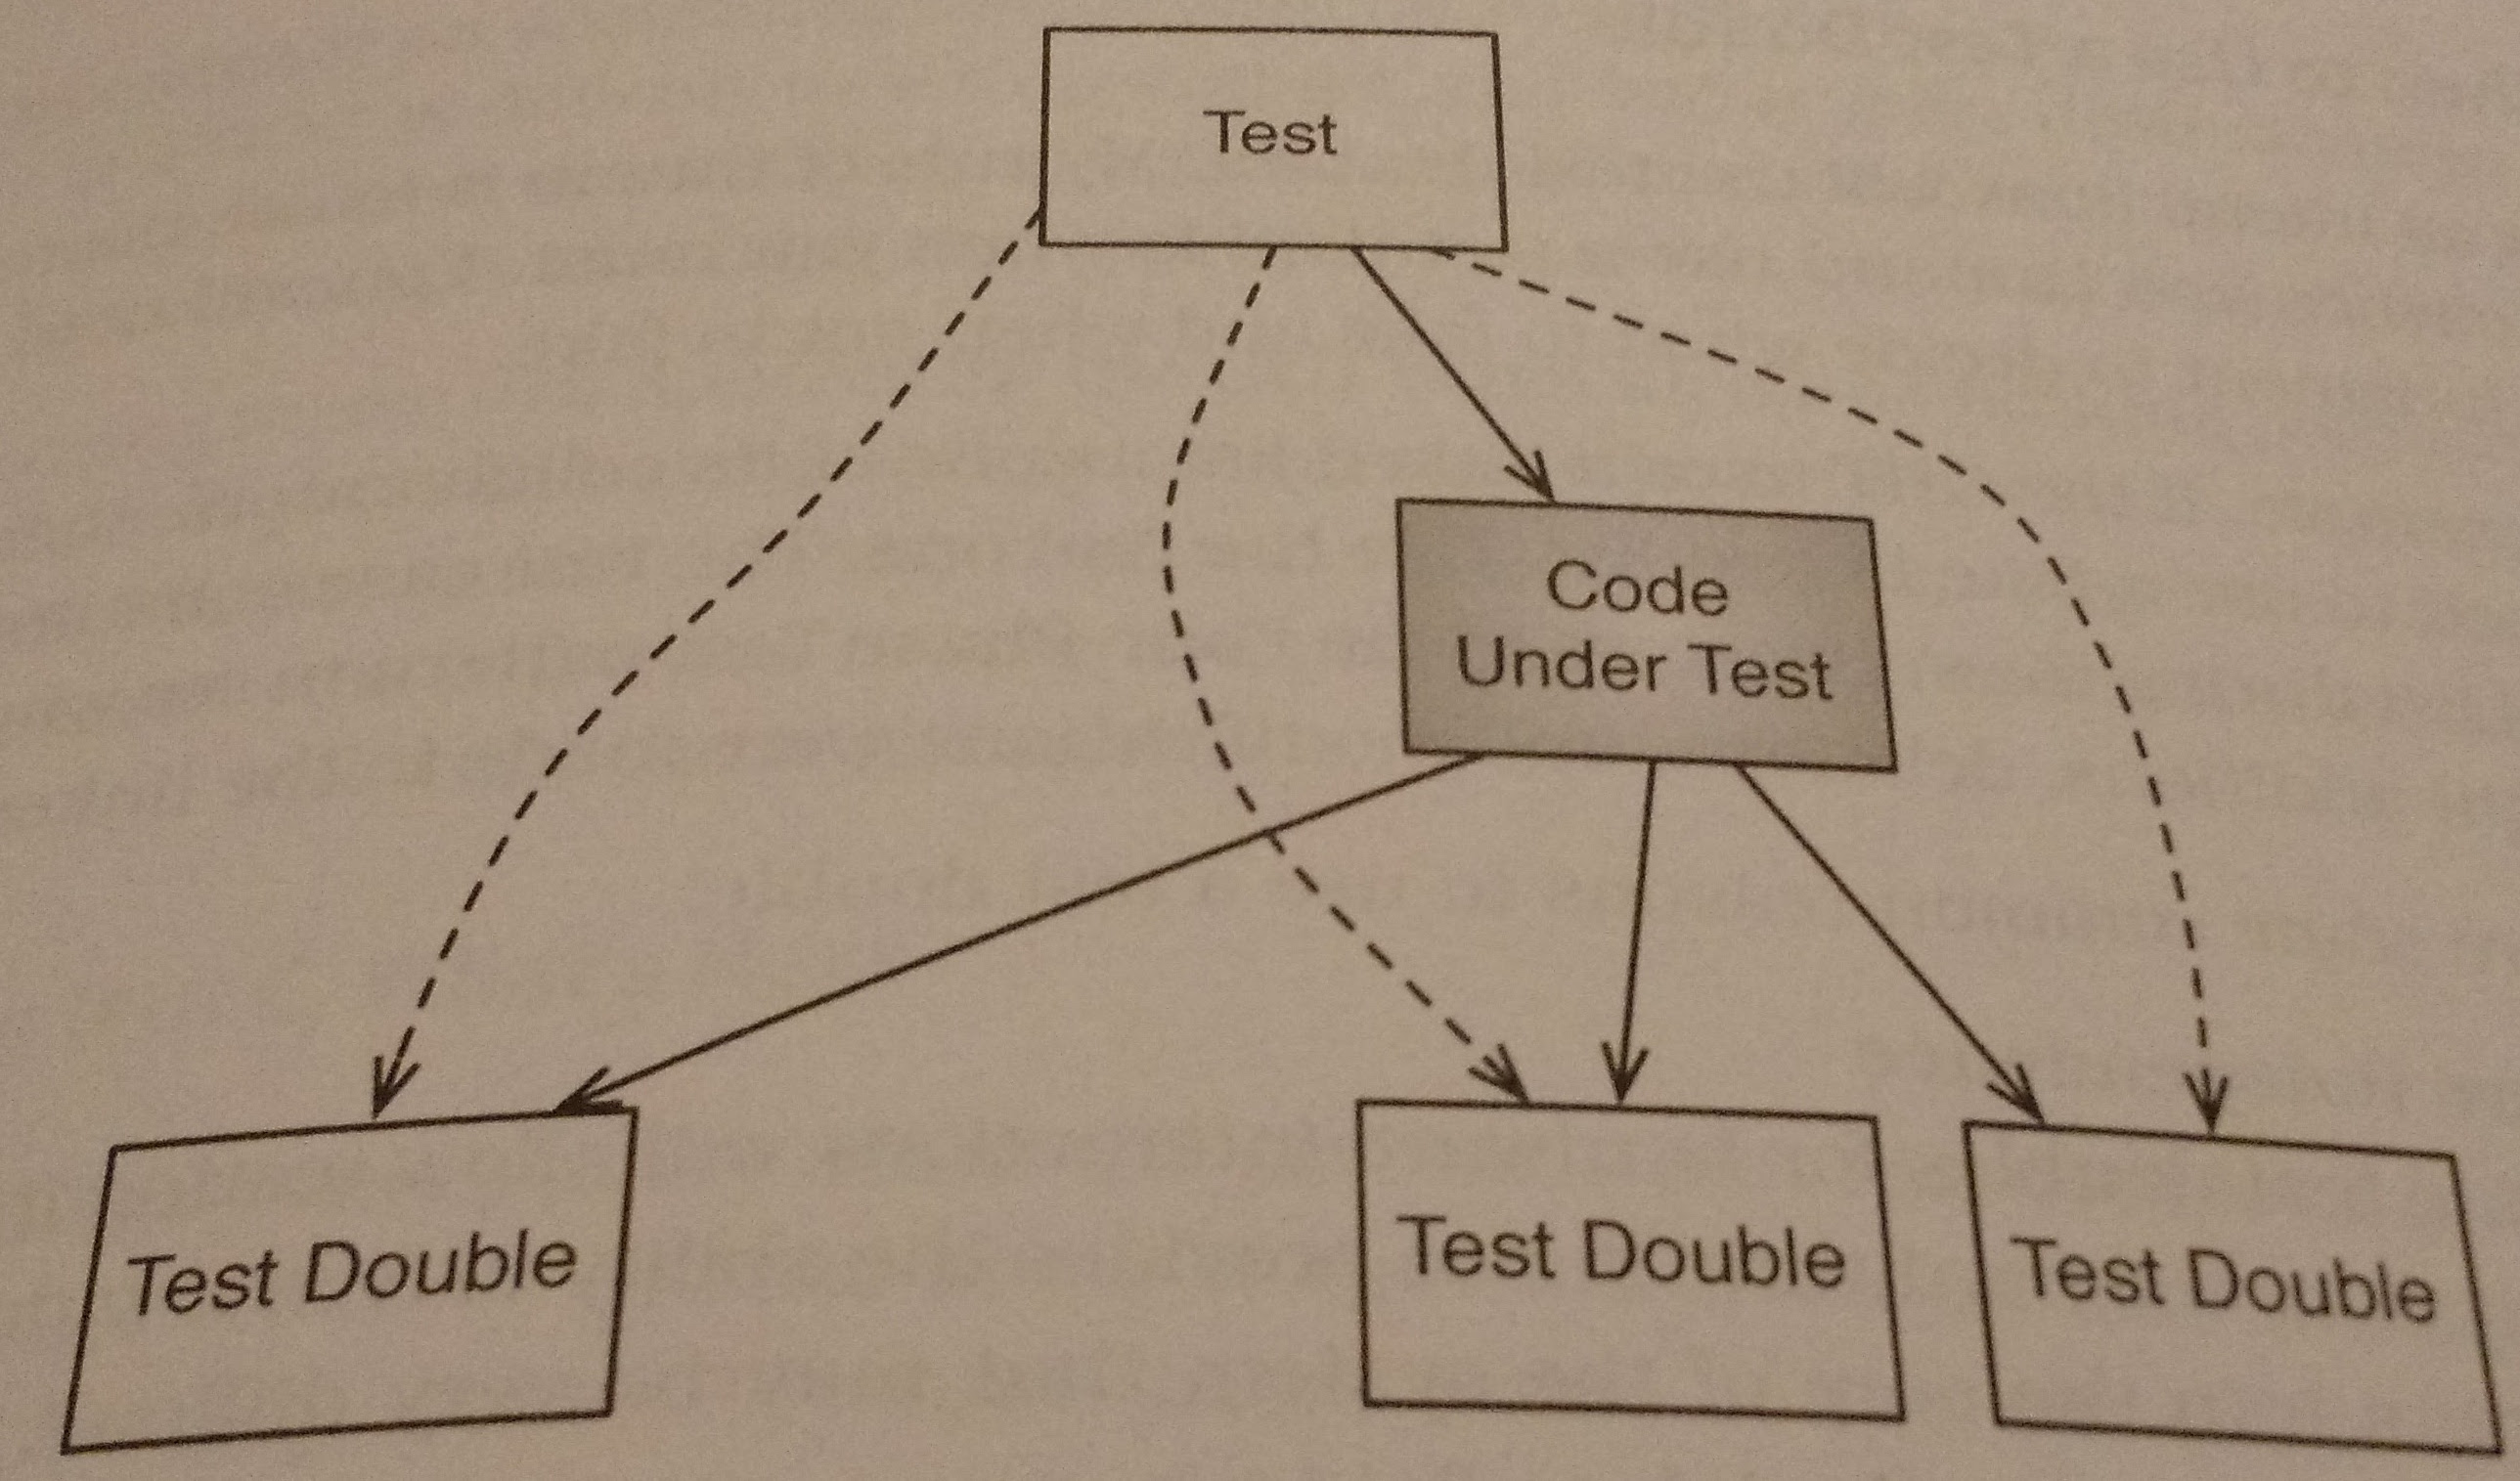
As the excerpt above states, the segments of code that we test often have collaborators and we must deal with those collaborators properly when we test code. We can impersonate these collaborators with test doubles. These impersonate the collaborators and allow us to send special values to the CUT and ensure that the collaborators are getting passed the proper input. To be able to make these test doubles our design has to have well defined interfaces between modules, without them it’s hard to know what we’re trying to impersonate. An illustration of the place for test doubles is given below:
The best times to use test doubles are when you want to:
- Gain Hardware Independence
- Inject Difficult to Produce / Rare Inputs
- Speed up Collaborators
- Stop Depending on Volatile Collaborators (e.g. Clocks)
- Work with something that isn’t fully Developed
To create these test doubles you generally have 4 options:
- Linker Substitution: You replace the collaborator for the whole executable. For example, you’d use this for a hardware test double.
- Function * Substitution: You replace the collaborator for only some of the test cases.
- Preprocessor Substitution: You can override certain functions with the
preprocesor, e.g. changing
malloc, this changes the actual code though and is recommended against. - Combine link-time and function * substitution: The linker initializes a
function * to
NULL, but each test sets the function * to what they need.
There are various types of test doubles, here are a few:
| Name | Description |
|---|---|
| Test Dummy | Satisfy the compiler / linker, but never used |
| Exploding Fake | Dummy + makes test fail if called |
| Test Stub | Dummy + return a value described by the test case |
| Test Spy | Stub + capture parameters passed in so test can verify |
| Mock Object | Verifies functions called, call order, and parameters passed, while returning specific values to the CUT |
| Fake Object | Partial implementation, to return different values depending on the input |
Chapter 8: Spying on Production Code
In chapter 8, James gives us a good example of setting up a couple of test doubles to test out a light scheduler. The light scheduler design and the consequent test design are shown below:
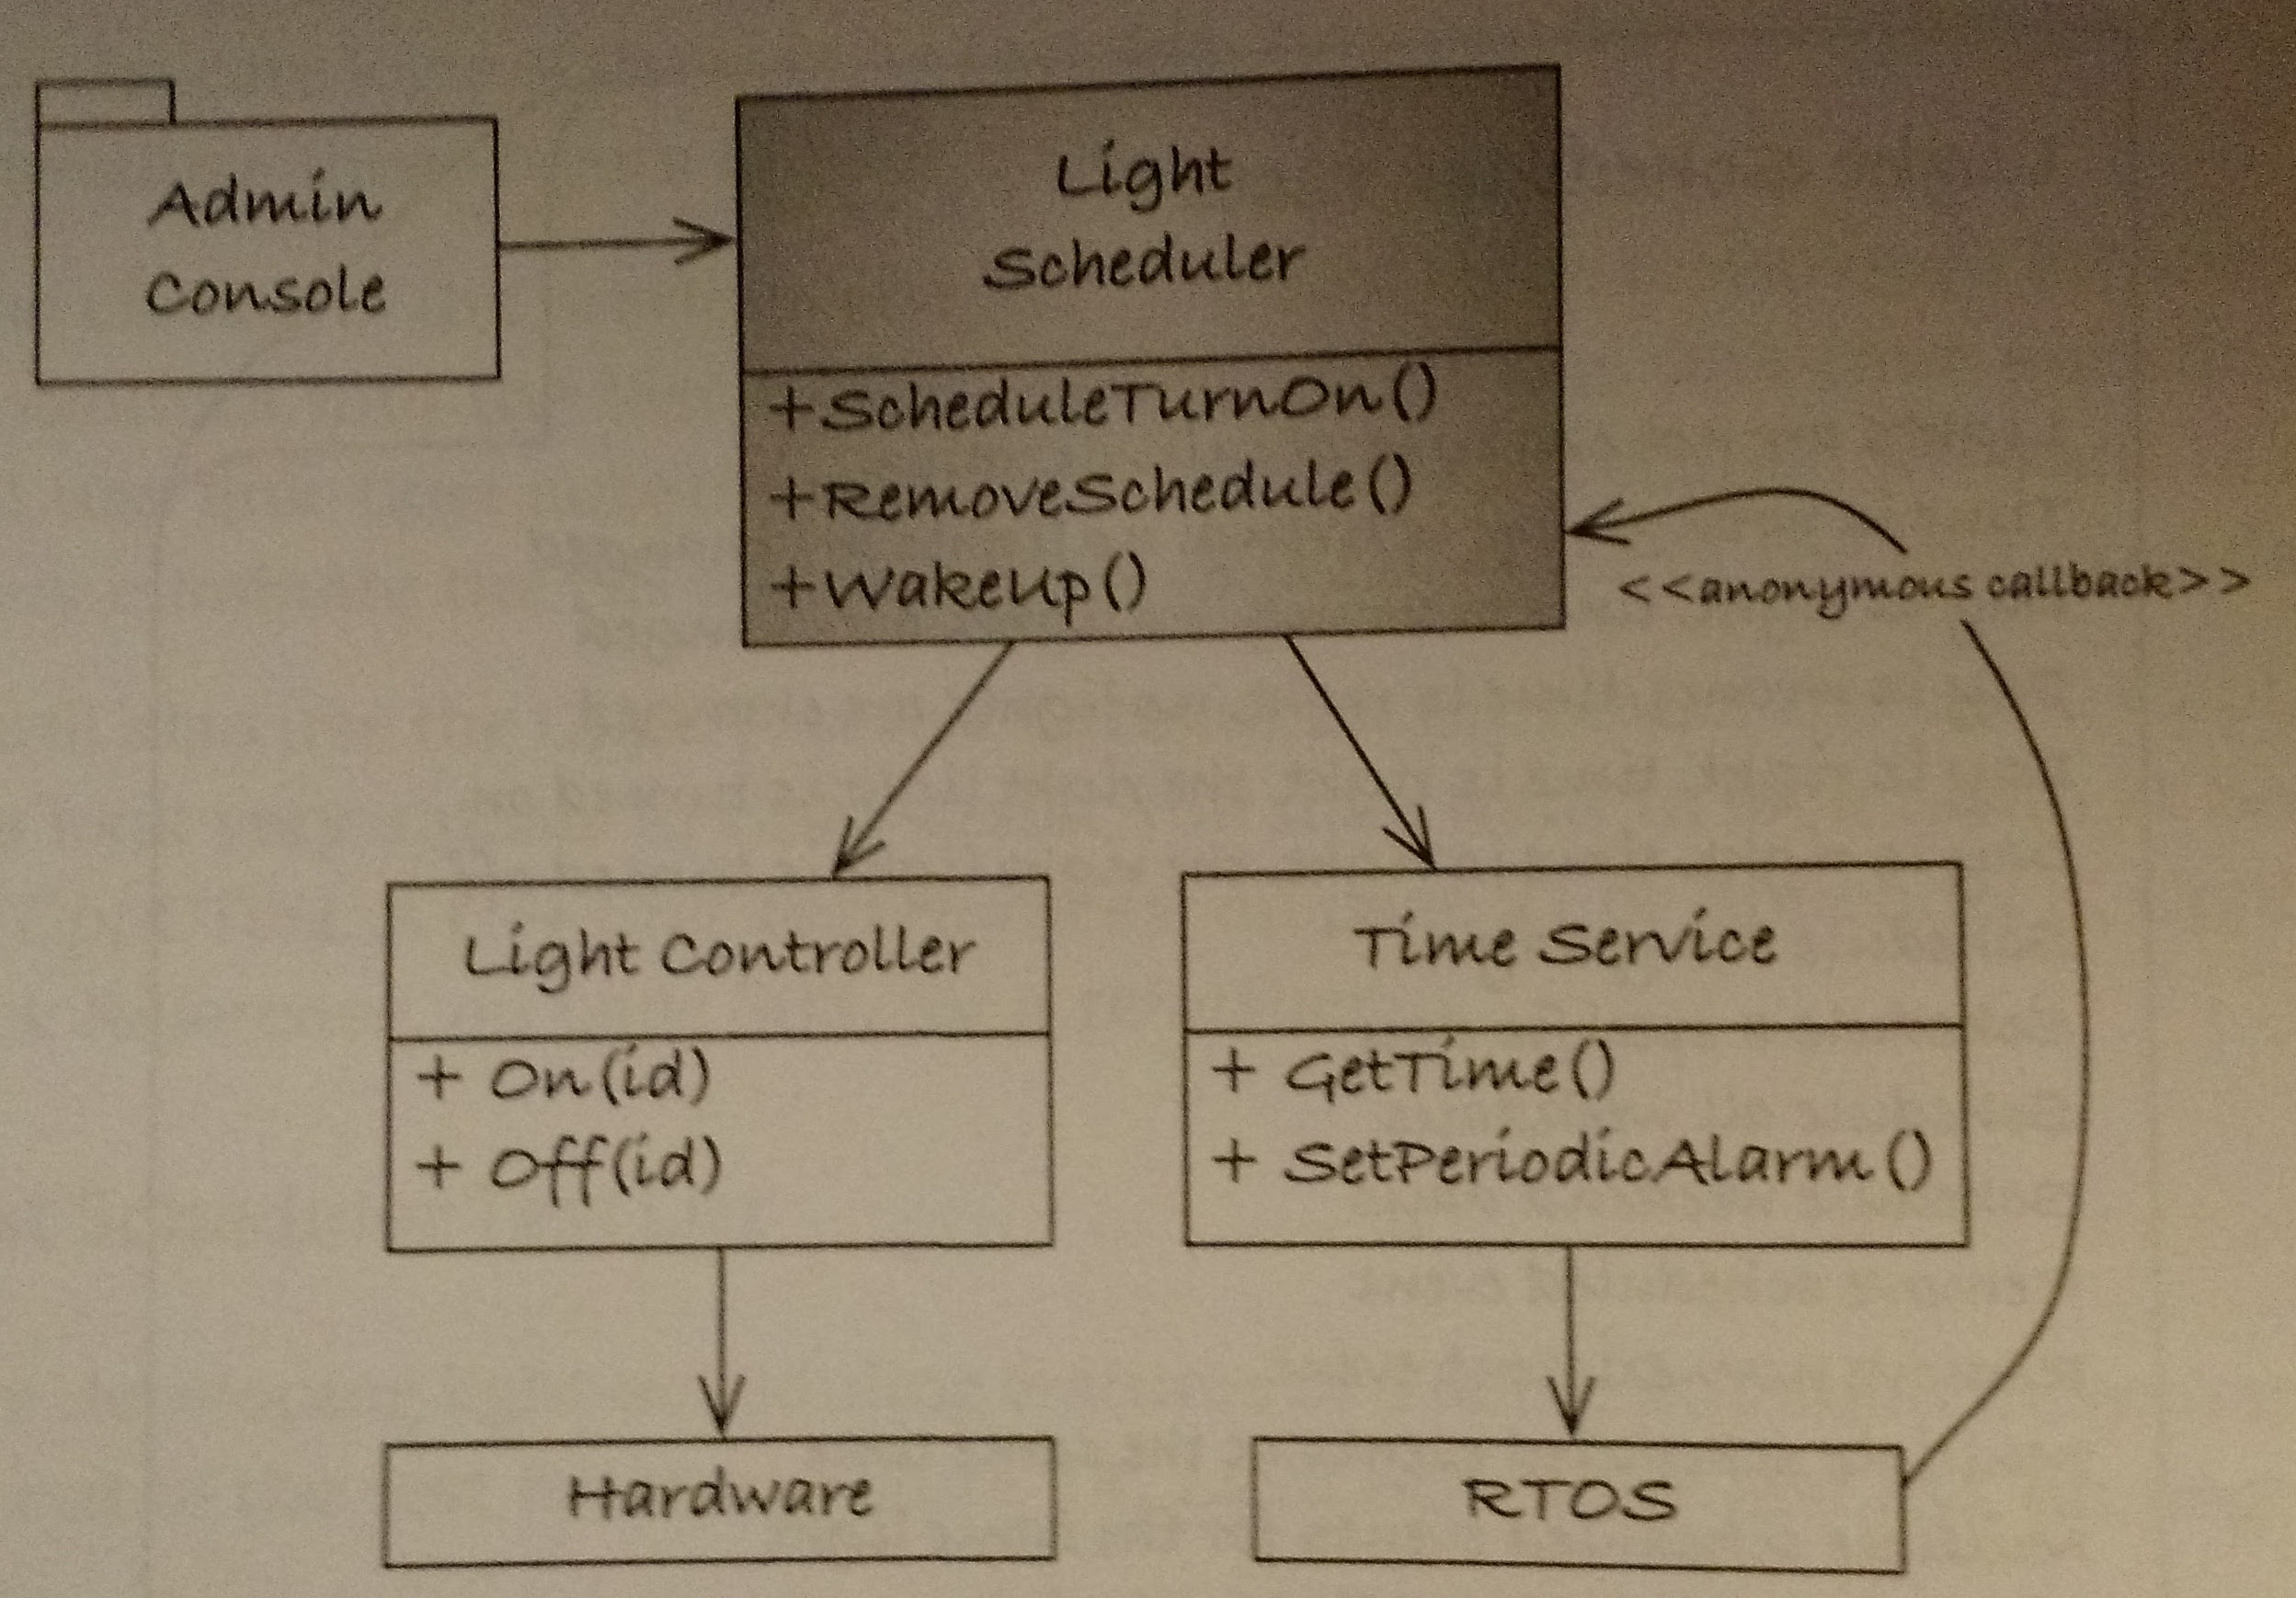
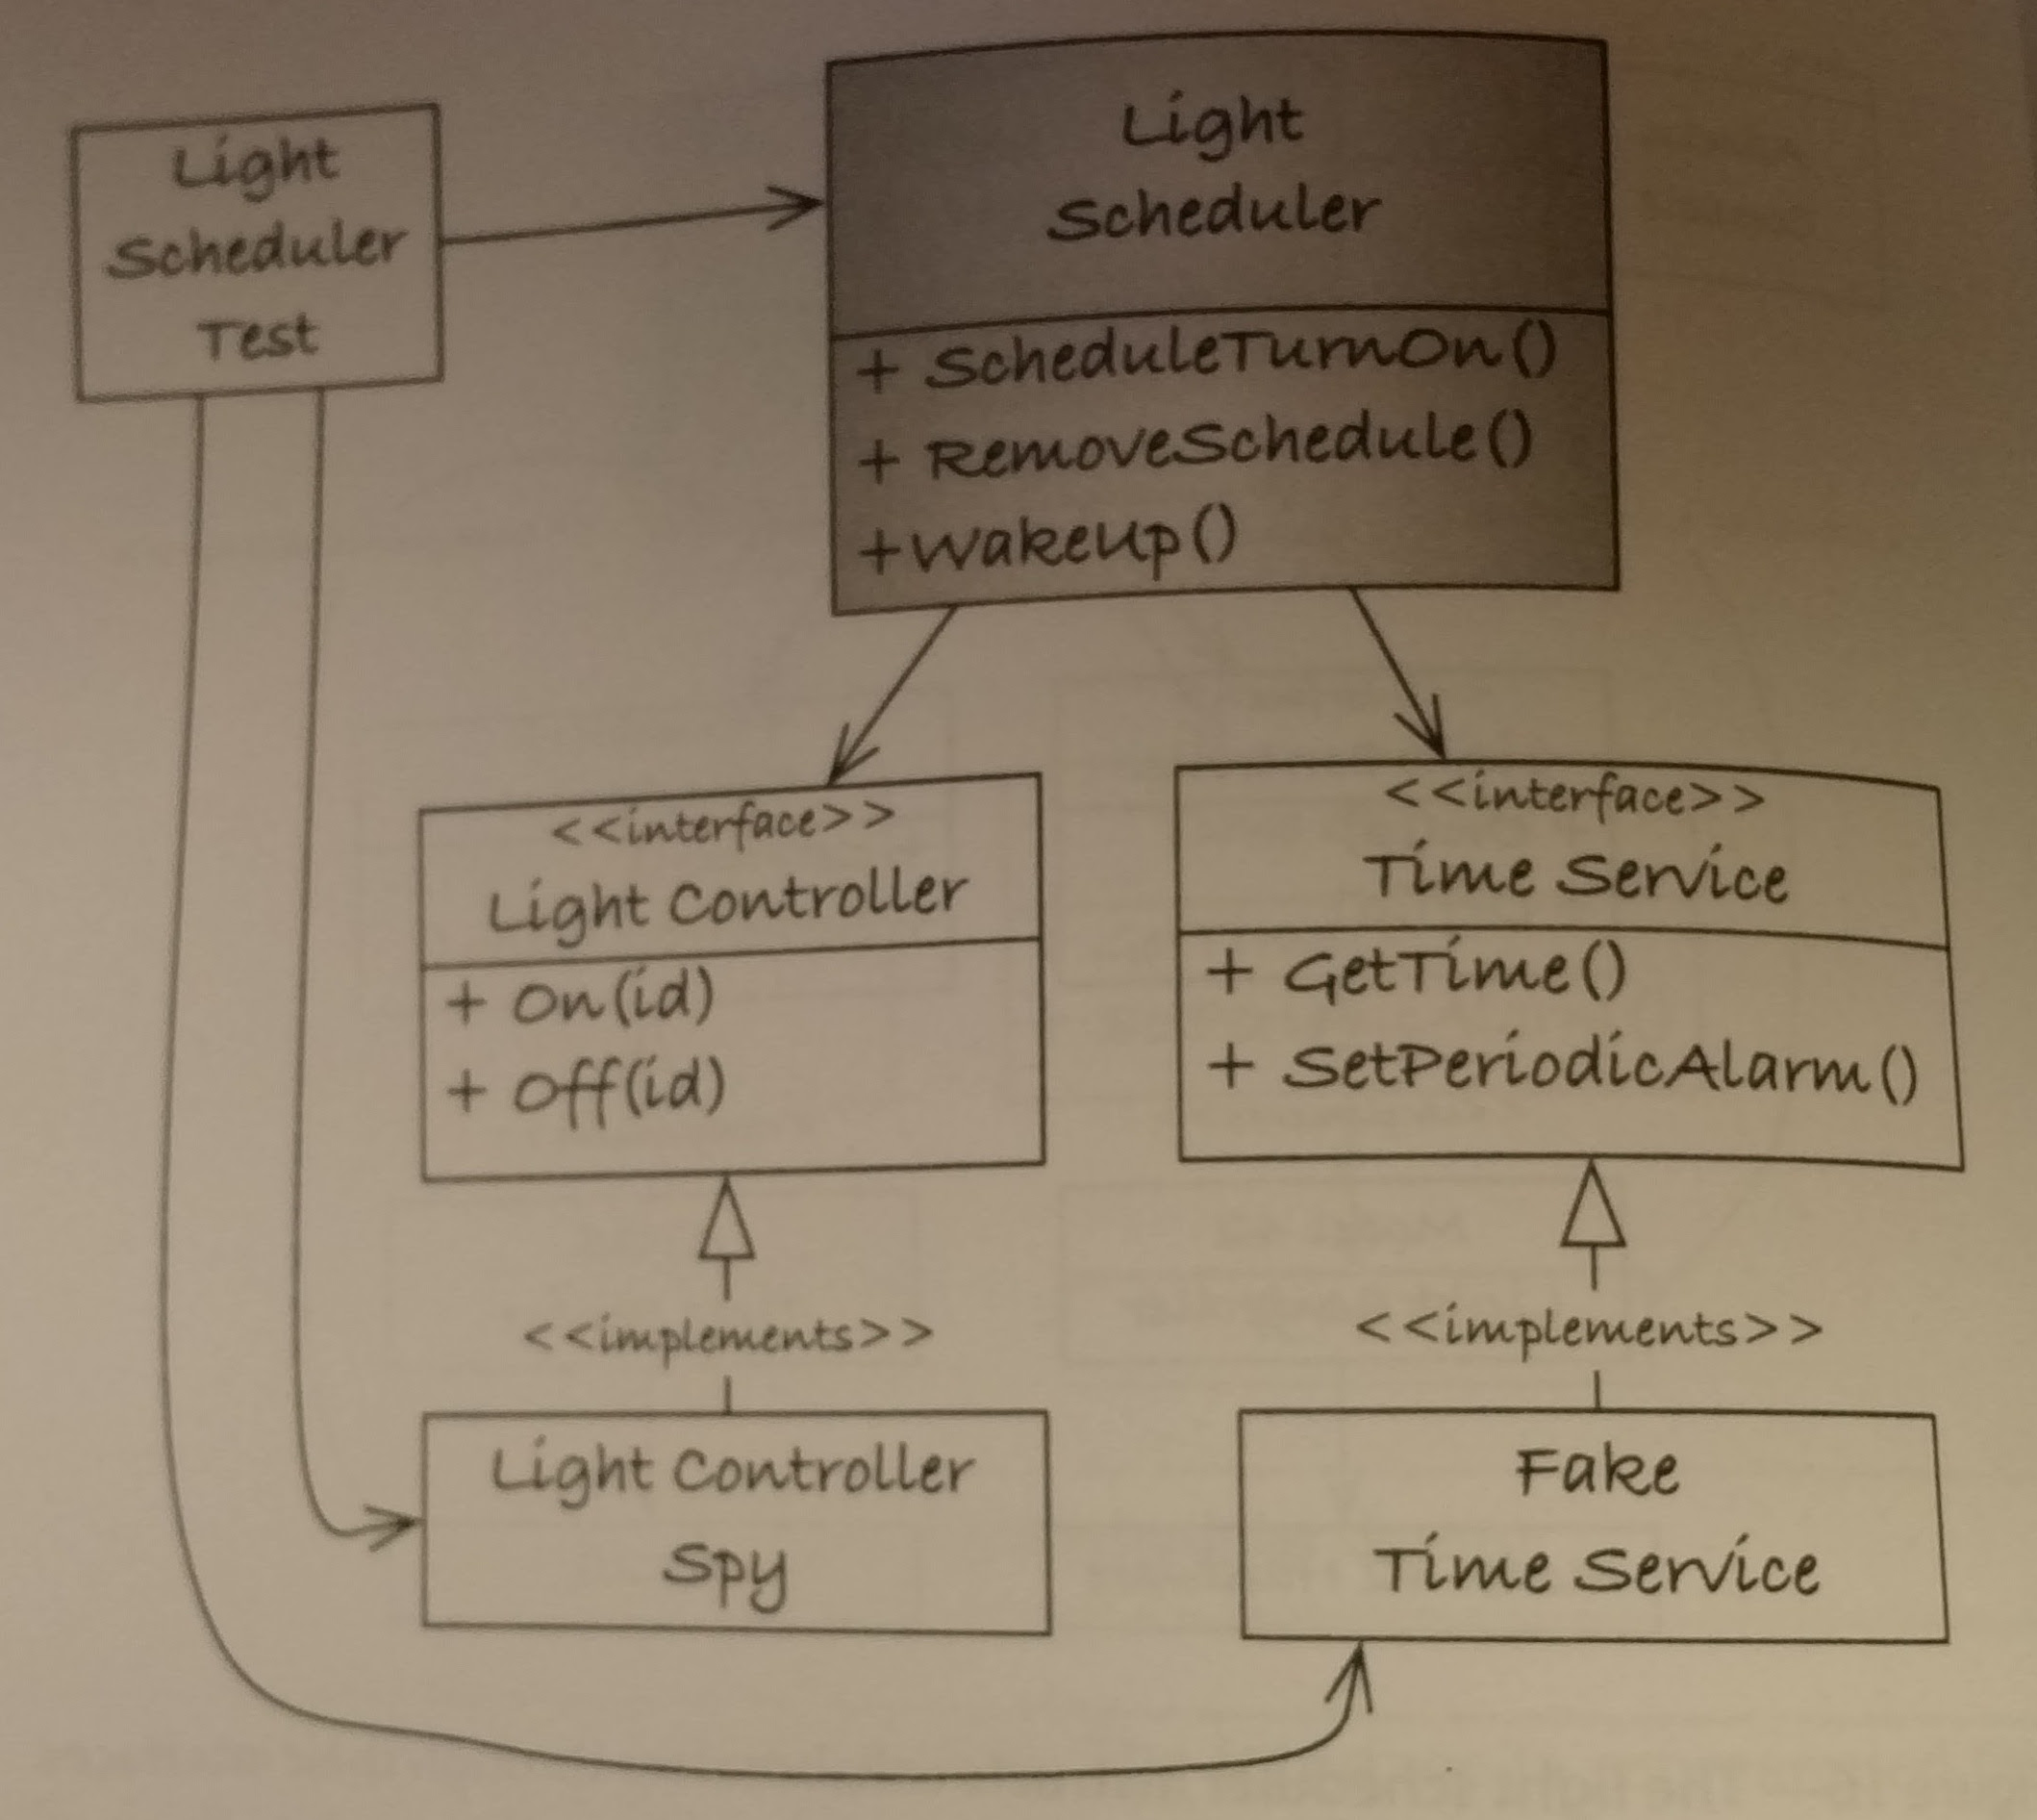
The test doubles fit in very well, another nice part about these tests is that they help make good abstractions for the various interfaces thus making the overall design that much cleaner. James uses link time substitution to create these tests. Also, note that you should add some tests that help highlight the use of these doubles, not so much to test them (very little can go wrong with them) but to show an example of the fake’s interface.
In the header file of the spy include the header of the spied interface.
An interesting point that he stresses is to follow the 0 –> 1 –> N policy. This means that when developing get the case where nothing is happening working, then try getting the case of 1 thing happening to work, and then move on to more than 1. Don’t be afraid to simplify your approach when starting off, then increasing complexity. Just make sure that when you increase complexity that you don’t burn bridlges until you’ve gotten the new code working. There’s some pretty good source code in this chapter, check it out here.
Chapter 9: Runtime-Bound Test Doubles
While the previous chapter uses link-time substitution during test creation, this chapter deals more with using function pointers. An example of how to set this up follows:
// .h file
extern int (*DoSomething) (void);

// .c file
int DoSomething_Impl(void) {
    return 2;
}
int (*DoSomething) (void) = DoSomething_Impl;
During testing you can set this function pointer with your own functions, you
usually save it, change it, and restore it. CppUTest has a macro to do this
calld UT_PTR_SET. Using function pointers is quite powerful, but try to use
them sparingly since link time changes are usually cleaner and the pointers can
add an unecessary layer of complexity.
Chapter 10: The Mock Object
During this chapter James describes the use of Mock Objects, extremely helpful test doubles that can be used to verify calls performed on an interface, along with generating specific output. These mock objects are not simulators, but can allow for simulations of various scenarios one at a time.
James chooses to mock a ST 16 Mb Flash Device. How he sets up the mock is illustrated below.
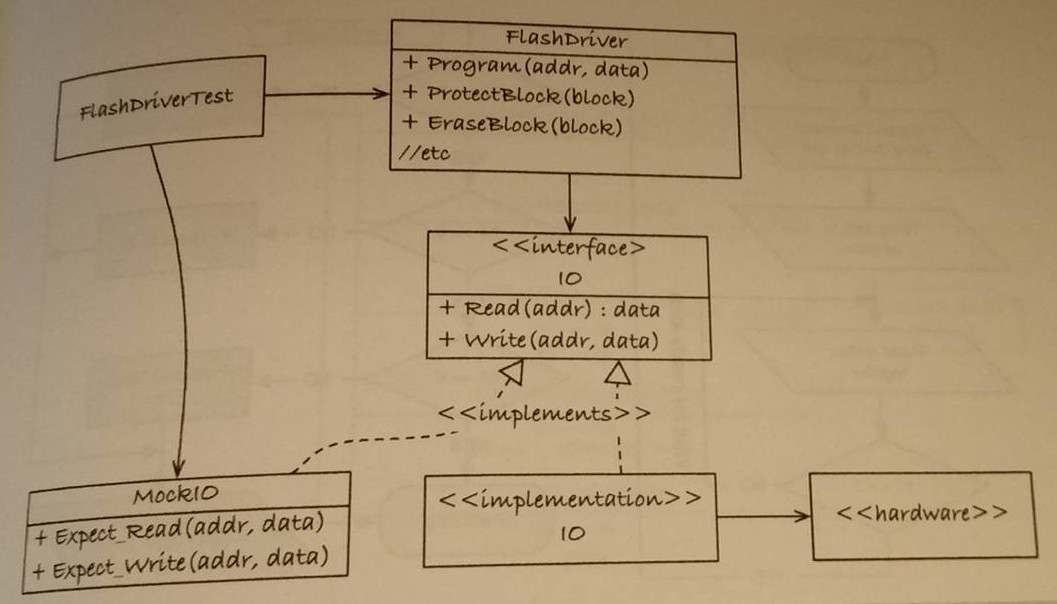
This mock mocks the communication to the peripheral from the processor and is
known as MockIO, it implements 3 additional functions apart from the defined
interface and its own create and destroy functions:
MockIO_Expect_Write(ioAddress offset, ioData data);
MockIO_Expect_ReadThenReturn(ioAdress offset, ioData returnData);
MockIO_Verify_Complete(void);
The expect_write function is straightforward enough, while the
ReadThenReturn offers the super useful ability of telling the test code what
it is going to get back. The verify_complete command simply makes sure that
there are no further expectations. This mock enables us to also try out very
rare failures in the driver and ensure we take the proper response to them.
Note that he didn’t mock the device, but the IO line, allowing each test case to specify only what it needed to mock the hardware in that situation. Check out the source code.
Mock Generators
Mock generators reduce the duplication necessary between mocks.
CppUMock is a part of CppUTest that supports a very generalized mock using the niceties of C++. It does not enforce ordering however, which can be a problem in certain situations like the flash driver.
CMock is a sibling of Unity that actually generates code that conform to a specified interface header file. It generates most of the code that you’ll need and you can customize the generated .c file as you see fit. You definitely have to do more writing than in CppUMock, but everything stays in C.
Design & Continuous Improvement
Chapter 11: SOLID, Flexible, & Testable Designs
This chapter comes a little out of left field, design talk in a book about testing, what? James justifies this mishmash by pointing out that testing drives good design and offers some useful advice.
James talks about S.O.L.I.D design principles, they follow:
- S - Single Responsibility, do 1 job and do it well
- O - Open Closed, open to extension & closed to modification
- L - Liskov Substitution, have semantically replaceable servers
- I - Interface Segregation, tailor your interfaces to the client
- D - Dependency Inversion, depend on the abstractions, not the details
James then dives into advanced C constructs for supporting these design principles. All of these constructs use S and D, the last two show how to use O and L.
- Single-instance module - hide internal state when only 1 instance
- Multiple-instance module - hide internal state with > 1 instance
- Dynamic interface - allow interface functions to be assigned at runtime
- Per-type dynamic interface - allow > 1 type of module with identical interface to have unique functions
The single and multiple instance modules are nothing new and just involve hiding the struct declaration in the .c file and the defintion in the .c file respectively. As projects change we must adapt and allow interface functions to be defined during runtime this leads to the desire for polymorphism.
Polymorphism in C
Polymorphism is used in C++ for classes to have the same interface with
different implementations (for the most part). We can create polymorphism in C
by using a base struct as the first field in other structs. Thus we can pass
pointers to the GenericStruct around and then in the separate structs we can
automatically cast those GenericStruct pointers to their own type.
typedef enum Type {
    Type1,
    Type2
} Type;

typedef struct GenericStruct {
    Type type;
    int id;
} GenericStruct;

// specific.c
typedef SpecificStruct * Specfic;
typedef SpecificStruct {
    GenericStruct base;
    int additionalField;
} SpecificStruct;
We could call these functions with a huge case statement based on the type of
the struct, but to maintain an Open Closed system we can do better. A
dynamic interface allows us to fix this.
Dynamic Interfaces
When we define an interface, we can specify a struct or ‘table’ of function pointers as such:
// GenericPrivate.h (Private so people ignore)
typedef struct GenericInterfaceStruct {
    void (*DoStuff)(Generic);
} GenericInterfaceStruct;
In a single dynamic interface, you can have one main interface that gets configured at run time. Then the calls on the generic struct merely call the interface defined functions. To get even more dynamic you can create a per-type dynamic interface by allowing a table of function pointers to live in the base class. Each specific struct sets that table on initialization. This is the same concept that C++ uses to resolve virtual functions, these tables are known as vtables.
As a final note for design, the author espouses the XP rules of design:
- Runs all the tests
- Expresses every idea
- Says everything only once
- Has no superfluous parts
Chapter 12: Refactoring
This chapter is all about refactoring. To refactor well you need these 3 critical skills:
- Nose for Bad Code
- Vision of Better Code
- Transform the Code
Code Smells
James lists a bunch of code smells, here you are:
| Problem | Possible Fix |
|---|---|
| Duplicate Code | |
| Bad Names | |
| Bad pasta (integration) | |
| Long functions | Make it short enough to fit into your working memory |
| Abstraction Distraction | Keep a consistent level of abstraction in a function, hide small details |
| Bewildering Boolean | Abstract conditionals into functions |
| Switch / Case disgrace | Too much logic in the case statements, just use it for channeling |
| Duplicate switch / case | Not following OCS, use it |
| Nefarious Nesting | Abstract big nests into functions |
| Feature Envy | Too many things using 1 object |
| Long Param List | Use structs |
| Willy Nilly Init | Create explicit init functions |
| Global free for all | Keep data structures hidden and use init |
| Comments | Only use them as excuses, hopefully your code self-documents |
| Commented-out code | Delete it, your source control will keep it around if you need it again |
| Conditional Compilation | This should be your last choice, ideally use the linker or function * s. |
James’s description of code pasta really intrigued me. He said that pasta code can be more than spaghetti (all loose and jumbled with too many ill-defined connections, it can also be ravioli (small modules loosely coupled by weak sauce) or lasagna (well-layered). Spaghetti is known for its high Cyclomatic Complexity: the number of paths through a function.
Transforming the Code
- When transforming the code, you need to get a vision for what a better version would look like; using comments is often very helpful.
- Then evaluate the function signatures to figure out what should be passed around.
- Remember don’t burn bridges while making changes.
- Remove the duplication.
- Separate ideas when they are stuck together.
- You can also use
#defineto quickly swap between the old and new code when trying to get the new code working. - Move functions to areas where they are more central and operate on more standard sets of data.
- Split the source file into multiple .c files when segregating common functionalities from platform specific ones.
James notes that a lot of people complain to him about the added overhead of these designs to their code, especially in embedded systems. He quotes Knuth, saying that you shouldn’t perform unecessary optimizations until you have a reason to.
Chapter 13: Adding Tests to Legacy Code
When dealing with legacy code, adding tests can get pretty difficult, following these policies and best practices can help a lot.
General Policy:
- Test drive new code
- Add test to old code before modifying it, this can sprout new functions into old calls
- Test-drive any changes
Use the ‘Boy Scout Principle’, “Leave it better than you found it.” When operating on code that has smells like you saw in the previous chapter try fixing. Instead of copy/pasting make a helper function. Rename poorly named variables.
Legacy Change Algorithm:
- Identify change points
- Find how to test the points found in (1)
- Break dependencies if you need to, to access the test points found in (2)
- Write tests
- Make changes and refactor
Test points come in all shapes and sizes, there are:
- Seams: Function calls, in really big functions you can add sensing variables to determine certain information.
- Global Variables: If some already exist, use them.
- Sensing Variables: Used to access deep into large functions
- Debug Output Sense: Use a spy to get debug output to confirm things
- Inline Monitor: The more general case of the debug output sense point, this encompasses all means of reporting information inside of methods, it can also allow checks to be made while tests are running.
Sometimes globally accessible structures need 2 initialization stages, add them when you must.
When getting these tests to run ‘Crash to Pass’, make it compile then link the find the dependencies and fix.
You can also create characterization tests that just characterize some of the functionality of the old code. You can also use tests to learn about the interface of the old code.
Chapter 14: Test Patterns & Antipatterns
While making tests, you can make poor design decisions. Avoid these test antipatterns:
| Antipattern | Resolution |
|---|---|
| Ramble-on test | It’s ok to repeat a little setup for each test |
| Copy-paste-tweak repeat | Use helper functions |
| Sore thumb | make separate groups when you need to |
| Duplication between groups | Use a separate helpers file |
| Test disrespect | don’t work in a group where people disrespect tests |
One test pattern is Behavior Driven Development, which tries to make things
more explicit with a format like this: given x when y then z. This methodology
is often referred to as giveWenZen.
Closing Takeaways for my Future Work
- Should I have a section on design in my book?
- Make an example of these testing frameworks.
- He had exercises at the end of his chapters, should I?
- Maybe I should think about Pragmatic Programmer as a publisher?
- I Should probably read an Arduino & a PI book for reference.
- Use
enum,const, or#definefor constants?
List of Possibly useful references that they mentioned
-
The Art of Designing Embedded Systems by Jack Gannsle (2000)
-
Refactoring: Improving the Design of Existing Code by Martin Fowler, Kent Beck, et al. (1999)
-
Programming with Abstract Data Types by Barbara Liskov (1974)
-
Agile Software Development, Principles, Patterns, and Practices by Robert C. Martin (2002)
-
The Pragmatic Programmer: From Journeyman to Master by Andrew Hunt & David Thomas (2000)
-
Working Effectively with Legacy Code by Michael Feathers (2004)
-
Endo-Testing: Unit Testing with Mock Objects by Tim MacKinnon, Steve Freeman, & Philip Craig (2001)
-
Agile Software Development, Principles, Patterns, and Practices by Robert C. Martin (2002)
-
Object-Oriented Software Construction by Bertrand Meyer (1997)
- Extreme Programming Rules of Simple Design
-
Refactoring: Improving the Design of Existing Code by Martin Fowler, Kent Beck, et al. (1999)
-
Clean Code: A Handbook of Agile Software Craftsmanship by Robert C. Martin (2008)
-
Scaling Lean & Agile Development by Craig Larman & Bas Vodde (2009)
- Extreme Programming Explained: Embrace Change by Kent Beck (2000)
